외부에서 데이터를 가져오다 보면 Public API를 사용하더라도 Call Limit이 있어서 데이터 요청에 제약이 있는 경우가 있습니다.
이럴 경우 많이 사용하는게 Proxy 서비스로 일정 비용을 내고 사용할 수 있습니다.
보통 인기 있는 프록시는 다음과 같습니다.
Thordata - High-Quality Proxy Service for Web Data Scraping
Choose Thordata for top-tier proxy solutions that ensure seamless data collection. Enjoy the best prices and services tailored for your needs.
www.thordata.com
Oxylabs - High Quality Proxy Service to Gather Data at Scale
The best proxy service platform with 100M+ Residential and 2M Datacenter IP proxies. Extract public data from any website with ease!
oxylabs.io
Bright Data - All in One Platform for Proxies and Web Scraping
Award winning proxy networks, powerful web scrapers, and ready-to-use datasets for download. Welcome to the world's #1 web data platform.
brightdata.com
하지만 돈을 아끼기 위해서 AWS 내부에서 Proxy를 구축한다면, EKS에서는 Squid Proxy로 간편하게 구축할 수 있습니다.
squid : Optimising Web Delivery
Squid: Optimising Web Delivery Squid is a caching proxy for the Web supporting HTTP, HTTPS, FTP, and more. It reduces bandwidth and improves response times by caching and reusing frequently-requested web pages. Squid has extensive access controls and makes
www.squid-cache.org
aws에 squid 컨테이너를 추가하는게 필요하다. 이때는 AWS ECR(ㄷElastic Container Registery)을 사용하면 됩니다.
이미지를 위한 도커 파일은 아래와 같이 작성합니다.
도커 파일을 보면 추가로 squid.conf 파일이 필요합니다. squid.conf는 프록시 설정 파일로 생각하면 됩니다.
Dockerfile
# 실행 이미지로 사용할 최소 기반 이미지
FROM alpine:3.18

# Squid 설치 및 기본 설정
RUN apk add --no-cache squid \
    && mkdir -p /var/spool/squid \
    && chown squid:squid /var/spool/squid \
    && rm -rf /var/cache/apk/*

# Squid 설정 파일 복사
COPY squid.conf /etc/squid/squid.conf

# Squid 실행 (포그라운드 모드)
CMD ["squid", "-N", "-f", "/etc/squid/squid.conf"]
squid.conf
http_port 3128
acl localnet src 20.0.0.0/16
acl SSL_ports port 443          # HTTPS 포트 정의
acl Safe_ports port 80          # 안전한 포트 (HTTP)
acl Safe_ports port 443         # 안전한 포트 (HTTPS)
acl CONNECT method CONNECT      # HTTPS CONNECT 메서드 허용

http_access deny CONNECT !SSL_ports  # 안전하지 않은 포트로의 CONNECT 차단
http_access allow localnet Safe_ports  # localnet에서 안전한 포트 허용
http_access allow localnet CONNECT SSL_ports  # localnet에서 HTTPS CONNECT 허용
http_access deny all            # 나머지 모두 차단

cache deny all                  # 캐싱 비활성화
forwarded_for off
via off
# access_log /var/log/squid/access.log squid
두 파일이 함께는 폴더 경로로 이동 후 이미지를 build하고 aws에 push 합니다.
아래 명령어들이 잘 수행하기 위해서는 docker가 설치 되어 있어야 하고, aws cli 설치 및 설정이 완료되어 있어야 합니다.
그리고 aws ecr에 repository를 생성 해야합니다. 이름은 자신이 사용하는 걸로!
docker build -t squid-proxy .

aws ecr get-login-password --region us-east-1 | docker login --username AWS --password-stdin <account number>.dkr.ecr.us-east-1.amazonaws.com

docker tag squid-proxy:latest <account number>.dkr.ecr.us-east-1.amazonaws.com/squid-proxy:latest

docker push <account number>.dkr.ecr.us-east-1.amazonaws.com/squid-proxy:latest
잘 들어간 게 보이면 완료!

다음은 AWS에 EKS에서 proxy pod를 띄우기 위한 Nodegroup을 생성합니다.
proxy에서 public ip를 사용하게 하기 위해, 노드그룹에서 public subnet 만 사용하도록 했고, 비용 절감을 위해 spot instance를 사용하도록 했습니다.
또한 비용을 저렴하게 하기 위해 Aamazon Linux ARM을 사용하는 이미지로 인스턴스 타입을 지정했어요.

이렇게 해서 ip가 추가로 필요하다면, 추가 노드를 할당하고 Deployment에 proxy를 개수를 늘려주는 방식으로 관리하려고 합니다. 그리고 우선 내부에만 사용하기 위해 cluster ip를 사용하도록 했습니다.
이제 k8s yaml 파일은 아래와 같이 작성합니다.
namespace.yaml
apiVersion: v1
kind: Namespace
metadata:
  name: squid-proxy
service.yaml
apiVersion: v1
kind: Service
metadata:
  name: squid-http-service
  namespace: squid-proxy
spec:
  selector:
    app: squid
  ports:
  - port: 3128
    targetPort: 3128
    name: http
  type: ClusterIP
configmap.yaml
apiVersion: v1
kind: ConfigMap
metadata:
  name: squid-config
  namespace: squid-proxy
data:
  squid.conf: |
    # HTTP 전용 포트
    http_port 3128

    # HTTPS 전용 포트
    http_port 3129

    # 로컬 네트워크 정의
    acl localnet src 20.0.0.0/16

    # 포트 정의
    acl HTTP_ports port 80          # HTTP 포트
    acl SSL_ports port 443          # HTTPS 포트
    acl Safe_ports port 80          # 안전한 포트 (HTTP)
    acl Safe_ports port 443         # 안전한 포트 (HTTPS)
    acl CONNECT method CONNECT      # HTTPS CONNECT 메서드 허용

    # HTTP 트래픽 허용 (3128에서 처리)
    http_access allow localnet HTTP_ports
    # HTTPS 트래픽 허용 (3129에서 CONNECT로 처리)
    http_access allow localnet CONNECT SSL_ports
    # 안전하지 않은 CONNECT 차단
    http_access deny CONNECT !SSL_ports
    # 나머지 모두 차단
    http_access deny all

    # 캐싱 비활성화
    cache deny all
    forwarded_for off
    via off
    access_log /var/log/squid/access.log squid
deployment.yaml
apiVersion: apps/v1
kind: Deployment
metadata:
  name: squid-proxy
  namespace: squid-proxy
spec:
  replicas: 20
  selector:
    matchLabels:
      app: squid
  template:
    metadata:
      labels:
        app: squid
    spec:
      nodeSelector:
        group: proxy
      affinity:
        podAntiAffinity:
          preferredDuringSchedulingIgnoredDuringExecution:
          - weight: 100
            podAffinityTerm:
              labelSelector:
                matchExpressions:
                - key: app
                  operator: In
                  values: ["squid"]
              topologyKey: "kubernetes.io/hostname"
      containers:
      - name: squid
        image: <account number>.dkr.ecr.us-east-1.amazonaws.com/<squid-proxy>:latest
        imagePullPolicy: IfNotPresent
        ports:
        - containerPort: 3128  # HTTP
          name: http
        - containerPort: 3129  # HTTPS
          name: https
        resources:
          requests:
            cpu: "100m"
            memory: "256Mi"
          limits:
            cpu: "100m"
            memory: "256Mi"
        volumeMounts:
        - name: squid-config
          mountPath: /etc/squid/squid.conf
          subPath: squid.conf
      volumes:
      - name: squid-config
        configMap:
          name: squid-config
이렇게 해서 띄우면 Proxy 여러 개를 사용할 수 있습니다.
잘 되었는지 확인해보면, 여러 개의 프록시가 잘 떠있는 걸 볼 수 있습니다. (k9s를 사용 중입니다.)

이제 프록시가 잘 동작하는지 임시 pod를 띄워서 확인합니다.
kubectl run -it test-pod --image=curlimages/curl --restart=Never --rm -- sh
curl로 ifconfig.me로 요청을 해서 ip를 확인합니다.
curl --proxy http://squid-http-service.squid-proxy.svc.cluster.local:3128 http://ifconfig.me
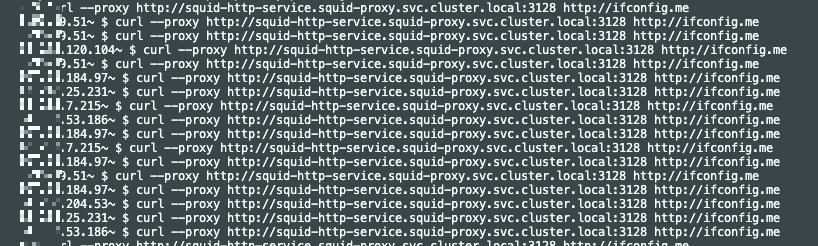
ip가 계속 변경되고 있습니다!
이제 데이터 수집을 하는 곳에서 사용하면 됩니다!
'개발' 카테고리의 다른 글
| WSL Ubuntu에 AWS 및 kubectl 설치 & EKS 연결 (0) | 2025.03.29 |
|---|---|
| WSL2(Windows Subsystem for Linux) 활성화, Ubuntu, Zshell, (0) | 2025.03.29 |
| "'_xsrf' argument missing from post" 에러, AWS EMR Workspace에서 발생 (0) | 2025.03.14 |
| Windows 개발용 초기 셋팅(2), 패키지 관리 Scoop (0) | 2025.03.09 |
| Windows 개발용 초기 셋팅(1), 터미널 & PowerShell 업데이트 (0) | 2025.03.09 |